
In Part-1 of the Prusa i3 MKS3S 3D printer kit build, I gave a brief overview of my build experience. In Part-2, I provide more details of putting the printer together.
First – some free advise. Take your time building this kit. It is a big assembly project. Trust me on this. In my case it took a full weekend to get it to work.
NOTE: Remember, the below steps are just highlights of my assembly experience. They do not match the assembly steps in the manual.
Step-1 – Pull the “Assembly Instructions” manual out of the big parts box, and then put the box away. Spend an hour or more going through the assembly manual. READ IT. Mark it up with notes. Get familiar with every step of assembly. All of it. Consume this manual if you want to be successful in your build.
Impression-1 – The documentation is excellent. As good as it is, I was tripped up in a couple of places that really sent me down some rabbit-holes. Details follow.
Step-2 – Inventory the parts in the boxes. There are a lot of parts in this kit. Again, the packaging of the parts is terrific. All in their own box, all well marked. This will save you a lot of time.
Impression-2 – The kit comes with a box of “extra” parts. Whoah! Does it ever. The box of extra parts is enormous. At one point I was beginning to believe I could build a second printer with the number of extra parts. I understand why they do this. Sending a missing or broken part to the US takes time and money.
Step-3 – DO NOT be in a hurry to assemble this kit. If you are pressed for time, or think you are so good you can bang this out in a couple of hours – you are seriously mistaken. Find a spot on your calendar where you can set aside a full weekend, or a series of many evenings to get this printer assembled. Also, make sure you have plenty of workbench space.
Impression-3 – Your success with this project is directly proportional to the amount of time you prepare and set aside to do the job right.
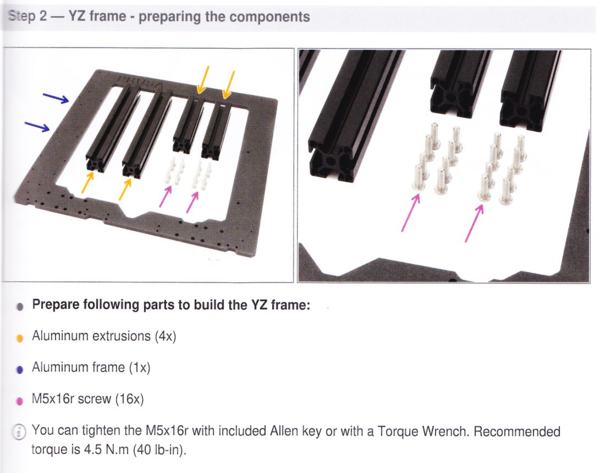
Step-4 – Begin the assembly process.
Impression-4 – Sample page from the assembly manual. Here is an example of the detail and quality of the assembly manual. Note: the manual is printed on thick, high-gloss paper. It is a beautiful thing.
Step-5 – My first stumble. My kit came with a black power supply unit (PSU). There are two pages of instructions for installing the PSU supports. Page 9 is for the black PSU, and page 10 is for the silver PSU.
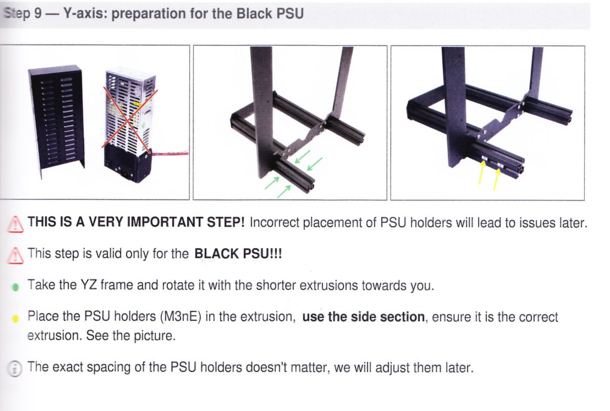
Notice the warning: THIS IS A VERY IMPORTANT STEP! Despite the warning, I did not get this right. It confused me, and I put the support bolts on the wrong side of the rails. The statement saying this will lead to issues later was not joke. I had to take the printer 1/2 apart to fix this problem.
Impression-5 – The manual should be updated when parts become obsolete. If Prusa is still shipping both units, then make this section of the manual clearer.
Step-6 – My second stumble. Ball bearings everywhere.
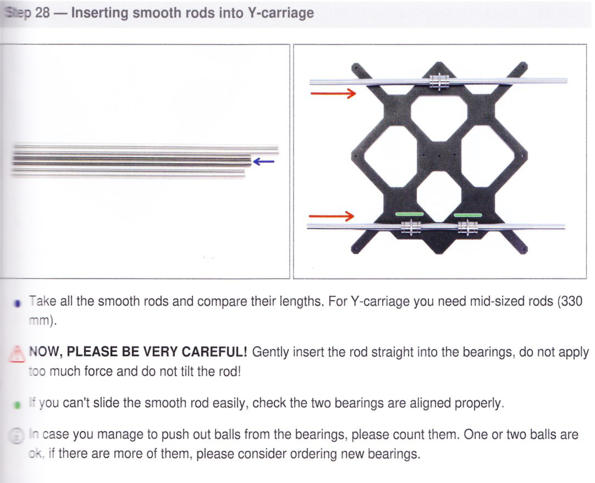
This step involved the insertion of the bed sliding rods into ball bearing guides/holders. There is a warning that says: “In case you manage to push out balls from the bearings, please count them. One or two balls are ok. If there are more of them, please consider ordering new bearings.”
The first rod went in fine. The second rod gave me some resistance, and when I exerted a small amount of force, “some” balls went flying. Not a lot – but “some.” The problem is, these balls are tiny. No wait – microscopic. I tried to chase the little devils to count them, but that was an exercise in impossibilities. There were not many.
I did get the rod inserted and it appeared to slide very smoothly – so I figured I was ok. Before I assembled the rest of the bearings, I lubed them with a light oil (3-in-1) and that really helped.
Impression-6 – The manual should instruct the use of a light oil on the rods prior to insertion in the bearing holders. Heck – a small tube of oil should be in the kit for this.
I will continue my build review in Part-3
Sopwith
Pingback: Prusa i3 MK3S 3D Printer Kit (Part-4) | Electronic Adventures with Sopwith
Pingback: Prusa i3 MK3S 3D Printer Kit (Part-3) | Electronic Adventures with Sopwith