SwitchDoc Labs SkyWeather2

My good comrade John Shovic over at SwitchDoc Labs has been very busy. As you may know, John is a high-energy, fun loving Maker, who specializes in designing electronic components and DIY kits for the Raspberry Pi. He is a very talented electronic engineer and educator. All of his projects are open sourced.

I was one of 151 backers who supported his SkyWeather2 KickStarter project late last year. SkyWeather2 is a major upgrade to the original SkyWeather project. I received the kit a couple of weeks ago, and finally found time to assemble it.

SkyWeather2 WeatherRack Sensor Array

The SkyWeather2 system uses a 433MHz radio signal to transmit sensor data. This is the same radio band used in garage door openers, remote control devices, baby monitors, etc. The kit comes with an SDR USB dongle receiver with an antenna. This captures sensor data from the WeatherRack and the indoor temperature/humidity sensor included in the kit.

Since I purchased the kit version, I had to 3D print the base unit components and purchase some additional hardware (screws, O-rings, standoffs, etc.). I also had to figure out how to install the required software because I did not want to take the ‘easy’ route by purchasing the already configured SD Card.

My SkyWeather2 system is up and running and it works great. I will have more to say about this unique, useful, and fun gadget. Stay tuned.


Announcing Release of BTFClock

Greetings smoke-eaters. It has been a while since ol’ Sopwith published a blog post. That is because I have been working hard on another clock project.

For those of you who do not want to read the rest of this post, here is the datasheet.

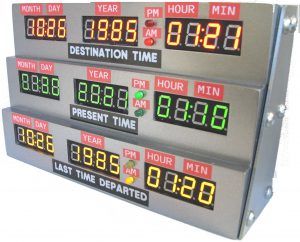
A while ago, I came across a very cool Thingiverse project by a French Maker comrade named jeje95. He created a replica of the time-circuit in the Delorean filmed in the classic movie Back to the Future.  Certainly one of the best movies ever produced, with a near cult-like following to this day.

jeje95 also produced a pretty funny video of his creation, that I highly recommend you watch.

I produced one of these clocks, and as all Makers are obligated to do, I decided to make it better. I ditched the Arduino for a Raspberry Pi Zero, added a much better real-time hardware clock (RTC), and a whole lot more.

Continue reading

Prusa Printer Update – 1 Year Later

It is hard to believe it has been a year since I bought my Prusa i3 MK3S printer. I have used it a lot. I am completely satisfied with its performance. I would estimate I have burned through about 8 rolls of filament. Along the way, I learned a few tricks – many of them the hard way. Here is the list:

  1. Completely clean the print bed between prints. This is super important. Everyone seems to have their favorite method, I prefer to use acetone to wipe down the bed. It should be as clean as a surgery room floor.
  2. Make sure the extruder nozzle area is spotless. When you have a print fail, it is often because the print object did not stick to the bed. Depending on when you discover this, you could have quite a mess on your hands. Before you start a print, make sure the entire areas around the print nozzle is clear of debris. If there are any remnants of melted filament from the previous print, it will surely mess up your current print.
  3. Invest in better filament. I have used both PLA and PETG filament in my printer with excellent results. As I said in a previous post, I am not a big fan of the Prusa filament. I also had pretty miserable experiences with the Inland brand of filament sold at MicroCenter and on Amazon. It is cheap – so I guess you get what you pay for. I have had excellent success with the 3D-Solutech and HatchBox filaments, and highly recommend them. HatchBox seems to be a favorite among Prusa users. I also bought a roll of pink PLA from TecBears and it worked great.
  4. Store filament in airtight plastic bags with a desiccant bag. Living in southern California does not put a lot of stress on 3D filament. If you live in an area with high humidity, beware – filament breaks down quickly when it is around moisture.
  5. Clean everything up after a failed print. You will have prints blow up on you. In many cases this will make quite a mess. Most of my failures occur because the print object is not oriented correctly. One time, I failed to clean up the mess completely, and some hair from the failed print got stuck in the print fan. This caused the thermal sensor in the print head to shut down the printer.
  6. Keep your printer firmware up to date. I use the Prusa slicer to prepare my prints. The slicer puts a notification file on the SD card that tells the printer there is a new firmware version available for the printer. It only takes a few minutes to upgrade the printer firmware using a laptop coputer.

Prusa i3 MK3S 3D Printer Kit (Part-4)

This is the final entry in the 4-Part blog posts re. my Prusa i3 MK3S printer. The previous posts can be found here: Part-1, Part-2, Part-3.

Once I completed assembly of my printer, I followed the instructions to do a self-test and calibration. The self-test failed while performing the “Loose belt pulley test” on the X-axis. The manual said to be sure the motor pulleys are not loose, and to be sure the screws are tightened against the flat part of the pulley shaft.

First, I checked all the pulleys and they were not loose. This was puzzling to me, because I could not get rid of the error. I finally decided to re-tighten the X-Y belts. This fixed the problem. I was quite surprised how tight the belts had to be in order to pass the self-test. If you run in to this same situation, check your belt tension.

The next challenge I had was getting the print head depth calibrated correctly. I followed the instructions using the ‘sheet of paper’ method, but the hard part for me was getting the “first layer” calibration correct. This involves getting the perfect Z-axis height at the beginning of the print. The instructions really did not provide a lot of help – they simply describe, in general, what the thickness of the print layer should be.

Continue reading

Prusa i3 MK3S 3D Printer Kit (Part-3)

In Part-1 of the Prusa i3 MKS3S 3D printer kit build, I gave a brief overview of my build experience. In Part-2, I provided more details of putting the printer together. Here in Part-3, I finish up describing the challenges I had during the assembly process.

NOTE: Remember, the below steps are just highlights of my assembly experience. They do not match the assembly steps in the manual.

Step-7 – Installing the X and Y belts. As the build continued, the number of parts to physically work around as you assemble components increases. I found the section on belt installation challenging. The toothed belts are provided flat – not a continuous loop. You have to bend a belt end tightly around a bolt on the belt tensioners, and run them around pulleys.

Impression-7 This part of the assembly took way longer than it should. It was very difficult to determine how to set the correct tension. This caused me great pain later in the assembly. I would say the belts mechanisms are one of the most important parts of a 3D printer.

Step-8Assembling the PSU. You may recall in Step-5, I assembled the PSU mounting bolts on the wrong side of the rail. Now that the printer was 75% assembled, it came to haunt me. When I went to mount the PSU, the screws were on the wrong side.

Impression-8 The manual was very predictive. “Incorrect placement of the PSU holders will lead to issues later,” is the ground truth. I had to disassemble a lot of parts to correct this issue.

Continue reading

Prusa i3 MK3S 3D Printer Kit (Part-2)

In Part-1 of the Prusa i3 MKS3S 3D printer kit build, I gave a brief overview of my build experience. In Part-2, I provide more details of putting the printer together.

First – some free advise. Take your time building this kit. It is a big assembly project. Trust me on this. In my case it took a full weekend to get it to work.

NOTE: Remember, the below steps are just highlights of my assembly experience. They do not match the assembly steps in the manual.

Step-1Pull the “Assembly Instructions” manual out of the big parts box, and then put the box away. Spend an hour or more going through the assembly manual. READ IT. Mark it up with notes. Get familiar with every step of assembly. All of it. Consume this manual if you want to be successful in your build.

Impression-1 The documentation is excellent. As good as it is, I was tripped up in a couple of places that really sent me down some rabbit-holes. Details follow.

Step-2Inventory the parts in the boxes. There are a lot of parts in this kit. Again, the packaging of the parts is terrific. All in their own box, all well marked. This will save you a lot of time.

Impression-2 The kit comes with a box of “extra” parts. Whoah! Does it ever. The box of extra parts is enormous. At one point I was beginning to believe I could build a second printer with the number of extra parts. I understand why they do this. Sending a missing or broken part to the US takes time and money.

Continue reading

Prusa i3 MK3S 3D Printer Kit (Part-1)

I finally got around to assembling my Prusa i3 MK3S 3D printer kit. And it was quite an adventure. In the next couple of blog entries, I will walk through the experience.

The short version?

  1. I made the right choice buying this printer.
  2. The design, quality, and documentation are first-rate.
  3. The kit is not for beginners.
  4. It takes a long time to put it together.
  5. It did not work out of the box.
  6. 3D printing is a whole new world if you are a maker.
  7. 3D printing requires endless patience because it take time to make things.

Continue reading