SkyWeather2 Gmail Configuration

There are a log of Gmail users getting an unexpected surprise from Google if they use their Gmail password in other applications (Outlook, Thunderbird, etc.) These apps no longer work.

This is due to a security change Google is rolling out. Google now requires 2-Step Verification is activated and all ‘less secure’ apps must use an App password instead of a Gmail password.

Despite the surprise, this is a good security practice. I am all for it.

If you have your SkyWeather2 systems’ Email notification service configured with your Gmail password, these emails will be rejected by the Gmail servers. To fix this, you need to configure an App password for your SkyWeather2 system.

Fear not! I wrote up a ‘How-To’ document that walks through the process. It is pretty painless and only takes a few minutes.

You can find the document here.

Sopwith

Create a Custom PI OS Image

Anyone who has ever messed with a Raspberry Pi knows the drill. You download the latest Pi OS release image and burn it to an SD Card. Then you slide the card into the Pi and power it up. The Pi boots, you login with the default credentials, and you run ‘sudo rasp-config’.

You configure your WiFi access point, locale, keyboard, and timezone. You enable SSH, I2C, Camera, and whatever else you need for IO. Next, you run ‘sudo apt update’, ‘sudo apt upgrade’, and reboot. Finally, you log back in and install all your favorite software that is not installed on the base image (p7zip, pip, i2ctools, midnight commander, etc.)

For casual Pi users, this is a one-time or rare task. For experienced Makers who have gone through this drill dozens, if not hundreds of times – it is a real pain. For Makers who write lots of code and/or software installation scripts, this process is beyond irritating.

Continue reading

SwitchDoc Labs SkyWeather2

My good comrade John Shovic over at SwitchDoc Labs has been very busy. As you may know, John is a high-energy, fun loving Maker, who specializes in designing electronic components and DIY kits for the Raspberry Pi. He is a very talented electronic engineer and educator. All of his projects are open sourced.

I was one of 151 backers who supported his SkyWeather2 KickStarter project late last year. SkyWeather2 is a major upgrade to the original SkyWeather project. I received the kit a couple of weeks ago, and finally found time to assemble it.

SkyWeather2 WeatherRack Sensor Array

The SkyWeather2 system uses a 433MHz radio signal to transmit sensor data. This is the same radio band used in garage door openers, remote control devices, baby monitors, etc. The kit comes with an SDR USB dongle receiver with an antenna. This captures sensor data from the WeatherRack and the indoor temperature/humidity sensor included in the kit.

Since I purchased the kit version, I had to 3D print the base unit components and purchase some additional hardware (screws, O-rings, standoffs, etc.). I also had to figure out how to install the required software because I did not want to take the ‘easy’ route by purchasing the already configured SD Card.

My SkyWeather2 system is up and running and it works great. I will have more to say about this unique, useful, and fun gadget. Stay tuned.


Prusa i3 MK3S 3D Printer Kit (Part-3)

In Part-1 of the Prusa i3 MKS3S 3D printer kit build, I gave a brief overview of my build experience. In Part-2, I provided more details of putting the printer together. Here in Part-3, I finish up describing the challenges I had during the assembly process.

NOTE: Remember, the below steps are just highlights of my assembly experience. They do not match the assembly steps in the manual.

Step-7 – Installing the X and Y belts. As the build continued, the number of parts to physically work around as you assemble components increases. I found the section on belt installation challenging. The toothed belts are provided flat – not a continuous loop. You have to bend a belt end tightly around a bolt on the belt tensioners, and run them around pulleys.

Impression-7 This part of the assembly took way longer than it should. It was very difficult to determine how to set the correct tension. This caused me great pain later in the assembly. I would say the belts mechanisms are one of the most important parts of a 3D printer.

Step-8Assembling the PSU. You may recall in Step-5, I assembled the PSU mounting bolts on the wrong side of the rail. Now that the printer was 75% assembled, it came to haunt me. When I went to mount the PSU, the screws were on the wrong side.

Impression-8 The manual was very predictive. “Incorrect placement of the PSU holders will lead to issues later,” is the ground truth. I had to disassemble a lot of parts to correct this issue.

Continue reading

Prusa i3 MK3S 3D Printer Kit (Part-2)

In Part-1 of the Prusa i3 MKS3S 3D printer kit build, I gave a brief overview of my build experience. In Part-2, I provide more details of putting the printer together.

First – some free advise. Take your time building this kit. It is a big assembly project. Trust me on this. In my case it took a full weekend to get it to work.

NOTE: Remember, the below steps are just highlights of my assembly experience. They do not match the assembly steps in the manual.

Step-1Pull the “Assembly Instructions” manual out of the big parts box, and then put the box away. Spend an hour or more going through the assembly manual. READ IT. Mark it up with notes. Get familiar with every step of assembly. All of it. Consume this manual if you want to be successful in your build.

Impression-1 The documentation is excellent. As good as it is, I was tripped up in a couple of places that really sent me down some rabbit-holes. Details follow.

Step-2Inventory the parts in the boxes. There are a lot of parts in this kit. Again, the packaging of the parts is terrific. All in their own box, all well marked. This will save you a lot of time.

Impression-2 The kit comes with a box of “extra” parts. Whoah! Does it ever. The box of extra parts is enormous. At one point I was beginning to believe I could build a second printer with the number of extra parts. I understand why they do this. Sending a missing or broken part to the US takes time and money.

Continue reading

Prusa i3 MK3S 3D Printer Kit (Part-1)

I finally got around to assembling my Prusa i3 MK3S 3D printer kit. And it was quite an adventure. In the next couple of blog entries, I will walk through the experience.

The short version?

  1. I made the right choice buying this printer.
  2. The design, quality, and documentation are first-rate.
  3. The kit is not for beginners.
  4. It takes a long time to put it together.
  5. It did not work out of the box.
  6. 3D printing is a whole new world if you are a maker.
  7. 3D printing requires endless patience because it take time to make things.

Continue reading

About to Enter the 3D Printer World

I know you smoke breathers may find this hard to believe, but Ol’ Sopwith is finally going to enter the universe of 3D printing. I have dragged my feet on this technology for a couple of reasons.

  • I did not want to spend the money. $300 USD 3D printers are cheap and temperamental, and $2500 USD printers are way above what I am willing to pay.
  • I was afraid it would not be useful. (I do not want to waste time printing toy objects.)
  • I did not have the time to invest in learning a whole new technology from the ground up.
  • I did not have space for it.
  • I did now want a noisy, smelly device in my office or workshop.

Time have changed. I have a couple of projects I am working on that could really use the capabilities of a 3D printer. Plus the cost of really good printers has come down and the capabilities have gone up dramatically.

After extensive research, I decided the best printer on the market for price/performance is the Prusa i3 MKS3. The are built in Czechoslovakia by a company founded by Josef Prusa, one of the innovators in the 3D early days.

I ordered the kit version and am expecting it will take about 4 hours to assemble. It should arrive in a couple of days. I will post blog entries about my assembling, testing, and printing experiences so you can follow along.

Stay tuned.

Sopwith

Airplane Fun Revisited


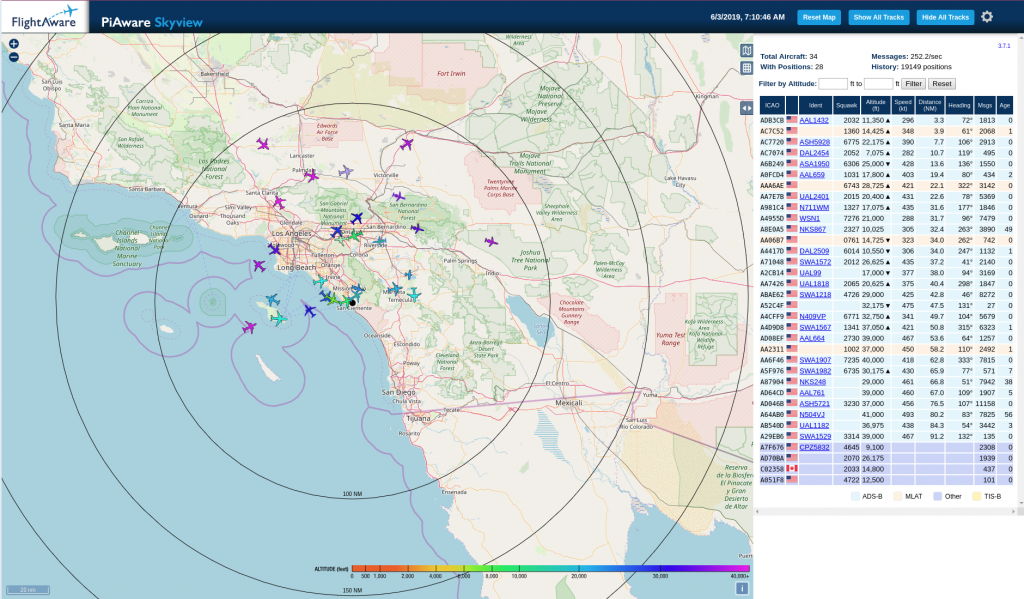
A very long time ago I wrote a blog about tracking airplanes. I was living in London at the time very near London City airport. That project was a lot of fun, so I hacked together another Pi setup to track airplanes here in the Los Angeles area.

I decided to install PiAware and provide my tracker feed to FlightAware. Why? Because if you do, you are given an Enterprise level account (value – $89 USD/month). I fly a lot and use the FlightAware app on my Android phone all the time. It is so easy to track my inbound airplane when I am waiting for a flight.

FlightAware has detailed instructions on how to build a PiAware setup.

The below image from FlightAware’s web site  shows how many other Makers have blazed this trail before me. That is a lot of Raspberry Pi’s folks.

For my setup I used the below components:

  1. Raspberry Pi3 B+
  2. Pi case with cooling fan
  3. RTL-SDR UBS dongle (This is what receives the radio signals from the antenna)
  4. An extended range WiFi adapter (USB)
  5. A FlightAware optimized antenna

Putting it all together was a snap. To install the software, follow the detailed instructions on the FlightAware web site.

Continue reading

Zabbix Agent User-Parameters

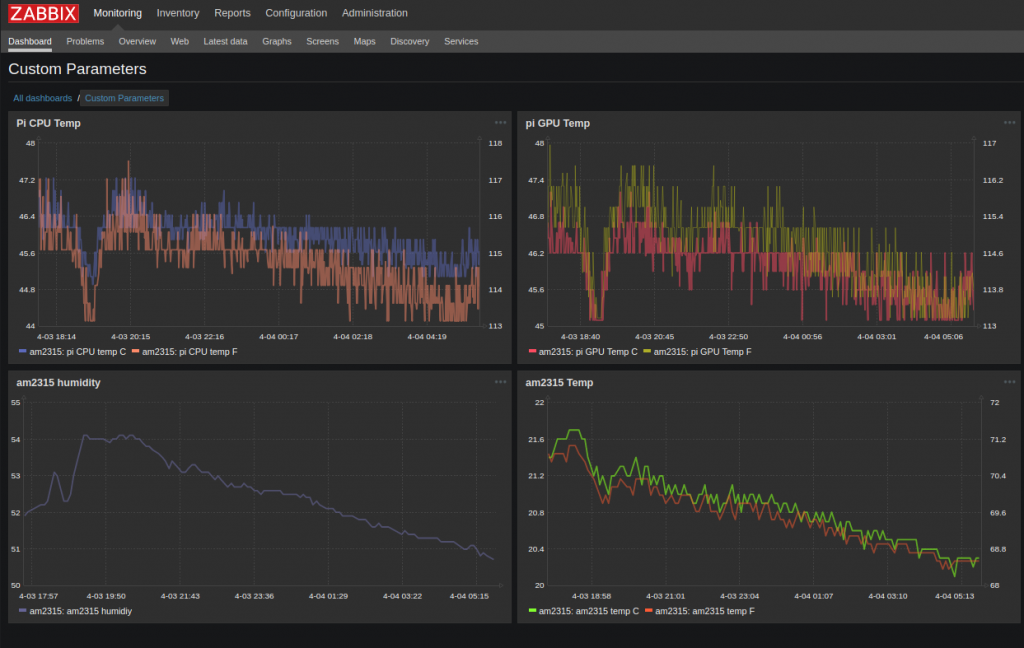
This is part three of the ‘How-To‘ series on leveraging the Zabbix IT monitoring platform using a Raspberry Pi. Part-1 showed how to install the Zabbix server on a Pi. Part-2 showed how to get the Zabbix agent running on a Pi. In this post, I show how to graph the CPU and GPU temperature of a Pi and the temperature/humidity readings from a precision AM2315 temperature sensor.

The Zabbix platform is incredibly flexible. It allows nearly endless possibilities of tracking and graphing data using custom User-Parameters. This is very useful to Makers since it allows the monitoring of sensor data on custom dashboards.

You can download the ‘How-To’ document here. I have also provided a zip file containing the custom scripts and agent configuration user parameter section on the downloads page.

Let me know how you use the Zabbix platform with your Pi fleet to monitor and track sensor data.