Heltec Lora CubeCell Fun – Part 2

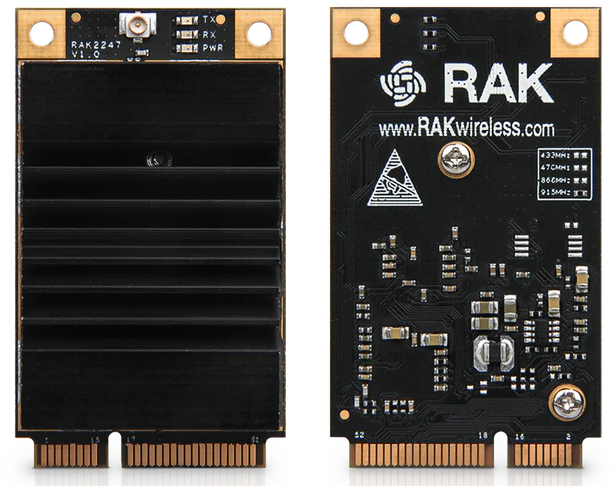
In Part-1 of this post I explored my attempt to get a LoRa gateway (RAK Wireless 2247) and end node (Heltec LoRa CubeCell) connected to TheThingsNetwork (TTN). After two days of deep  ‘funstration’ , I was about to give up. But ‘Ole Sopwith NEVER gives up. Up, over, or around – this experiment was going to work.

Many Makers at this point would strongly believe they were sold bum hardware. You know the drill, “When in doubt – blame the hardware.”  I do not subscribe to this theory. In all my years of Making, I cannot recall the last time I was shipped a Maker device that was DOA. Yes, it happens, but it is very, very, very rare. The QC in modern factories is excellent, and if something does not work out of the box, I blame the hardware last.

My problem was how to tell if the CubeCell connection problem was the CubeCell or the gateway – or both.

I spent a lot of time messing around with the devEui, appEui, and appKey arrays. Lots of documentation and videos suggest if your device does not connect, you should reverse the array entries to account for endian differences in the transport layer.

In fact, the TTN configuration page has a handy reversing capability that makes copying the entries in either order. Changing the endian order did not fix the issue.

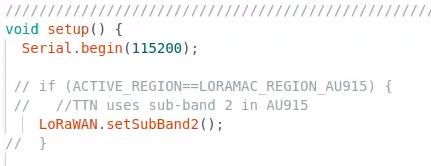
As i continued to review the source code of the Heltec SendReceive.ino example app, I saw this code in the Setup() function:

Continue reading

Heltec Lora CubeCell Fun – Part 1

I have recently been researching and doing some Making with LoRa devices. My main interest in this technology is for home automation and remote weather information. LoRa is an ideal solution here for three reasons:

  1.  The devices are relatively cheap, but they have doubled in price in the last year.
  2. The range of the devices is incredible – miles not feet.
  3. They are super low-power, meaning a battery can last for months or even years.

The first thing I did was build a LoRaWan gateway. I used a Rak2247 Gateway Concentrator with the matching Pi Hat.

RAK Pi Hat

RAK 2247


After mounting the rig atop a Pi3B+, I was able to get the device connected to TheThingsNetwork (TTN) without any trouble. The RAKWireless documentation is very good for this device.

Continue reading

Announcing Release of BTFClock

Greetings smoke-eaters. It has been a while since ol’ Sopwith published a blog post. That is because I have been working hard on another clock project.

For those of you who do not want to read the rest of this post, here is the datasheet.

A while ago, I came across a very cool Thingiverse project by a French Maker comrade named jeje95. He created a replica of the time-circuit in the Delorean filmed in the classic movie Back to the Future.  Certainly one of the best movies ever produced, with a near cult-like following to this day.

jeje95 also produced a pretty funny video of his creation, that I highly recommend you watch.

I produced one of these clocks, and as all Makers are obligated to do, I decided to make it better. I ditched the Arduino for a Raspberry Pi Zero, added a much better real-time hardware clock (RTC), and a whole lot more.

Continue reading

DOTKLOK Revival

Way back in 2013 a very creative and talented Maker named Andrew O’Malley created the DOTKLOK project. The project has been dormant for a very long time.

Ol’ Sopwith is a long time clock builder and I became fascinated with this project. Why? Several reasons: a really cool set of clock animations including ‘pong’, ‘space-invaders’, and ‘pac-man’, a custom Arduino design that is easy to build from through-hole parts, and excellent documentation.

In 2014, I purchased enough parts to build three DOTKLOKS. The only thing I did not have was the acrylic front and back panels. At that time, Andrew was selling the clock in kit form or assembled. The problem for me, was the cost was beyond what I was willing to pay.

Without the panels, I packed up the parts and stored them in the parts closet with the intention of building an enclosure out of wood when I found the time. Never happened.

Recently, I discovered there are plenty of on-line ‘self-serve’ laser cutting services that can cut the acrylic panels for a DOTKLOK. Although a set costs about $20 USD (ouch), I took the plunge and ordered a set of panels using the provided Inkscape SVG from the project.

Once the panels arrived, I created a ‘prototype’ DOTKLOK. When I loaded up the Arduino code version 1.5 into the Arduino development GUI, I quickly discovered the code failed compilation with dozens of errors. It seems the Arduino API has changed considerably over the last five years. No surprise.

After a fair amount of research and effort, I was able to upgrade the code and get a clean compile. I uploaded it to the DOTKLOK prototype and it fired right up. Oh the joy. There are still some problems with the code in some of the animations, but I will fix those soon.

As I always do, I decided to hack the original DOTKLOK design to make it better. The aluminum standoffs are ugly and Andrew used two of them stacked together to get the right length. I also want to use shorter standoffs to make the clock “thinner.”

I ordered black aluminum standoffs (metric) and matching screws from AliExpress (China). They should arrive in a couple of weeks. I also discovered the Sure LED arrays used in the project are still available from a few sources, but only available in red.

I will publish all of my work on the DOTKLOK revival project soon. If you are interested in purchasing a kit or assembled DOTKLOK, let me know. I will consider making them available.

Thanks again to Andrew O’Malley for creating such a cool project.

Sopwith


Hacking the Tastic RFID Tool

In my recent posts I hacked a BV4618 LCD to prepare it for use in my Tastic RFID project. Now that I have the BV4618 working and an improved and simple code library (sopBV4618_S), we return to the Tastic tool. If you are not familiar with the Bishop Fox Tastic project you can read about it here.

Ol’ Sopwith again wants to make it clear that I am not interested in the dark-side of RFID hacking. Nor do I encourage anyone to do so. The goal of this project is to learn about RFID and how it all works. Fascinating stuff.

After researching the Tastic RFID documentation I ordered three PCB’s using the Tastic project PCB documents. The vendor I used was OSH Park. Highly recommended outfit that does great work.

Tastic PCB

Tastic PCB

Continue reading

Hacking a BV4618 20×4 LCD (Part-3)

In Part-2 of this blog post series I provided a detailed ‘How-To’ for new users of the  ByVac BV4618 LCD for their Arduino projects. It is clear to me there are plenty of Arduino hobbyists who want to hack LCD’s and need a simple way to wire them up and write to them.

The ByVac BV4618 LCD is a great choice. You can actually get it up and running with three wires – V+, Gnd, and Tx. Writing text to the display is pretty straightforward using the BV4618_S library. The library is useful, but Ol’ Sopwith does not think the class is easy enough to use for beginners.

To solve this problem I extended the BV4618_S class library and created a new class named sop4618_S. The class is brain-dead simple to use and it hides all the complexities of the VT100 code sequences.

Continue reading

Hacking a BV4618 20×4 LCD (Part-2)

In Part-1 of this blog post series Ol’ Sopwith described the ByVac BV4618 LCD and how to wire it up to an Arduino Uno. If you are interested in how to program an Arduino to talk to this LCD, pull up a chair and let’s get started.

I wrote up a detailed implementation guide for the BV4618 LCD that walks through the entire process to get the LCD into one of your cool Arduino projects. If you are new to the Arduino and want a quick guide on how to setup the developer IDE you can follow this guide.

Arduino 'How-To' Series

Arduino ‘How-To’ Series

  Continue reading

Hacking a BV4618 20×4 LCD (Part-1)

My previous post describes my new venture into RFID hacking using a Tastic RFID stealer. The Tastic gadget requires a serial 4×20 LCD to display a proximity cards site code and serial number. I purchased a ByVac BV4618 LCD as a replacement to the LCD listed in the Tastic specifications due to local availability.

  BV4618 4x20 LCD         

As Sopwith always advises, the first thing you need to do with a new gadget is to download the datasheet. You can find it here. The internal controller/driver of the LCD is a Hitachi HD44780. This very popular device can be found in all types of LCD applications. The BV4618 piggybacks on the HD44780 providing a very convenient communication interface.

The BV4618 provides three interfaces. A serial interface provides support for both TTL and RS-232. This means you can connect a MCU such an Arduino or Raspberry PI, or use 12V serial connections to a serial port on a PC. There is also an I2C interface and support for a small numeric keypad.

Continue reading

Hacking a 20×4 LCD for RFID Research

Sopwith's  Current Project

Sopwith’s Current Project (BV4618 LCD)

Have not blogged much over the summer because the Mrs. and I have moved to London on a temporary work assignment. Anyone who has been an expat understands the complexities of a relocation. Now that we are here and settled, I can get back to my hacking projects. I bought my Rasberry Pi’s with me and purchased a couple of Arduino’s and bench tools at a local Maplin store.

My latest interest is in RFID cards. The use of this technology is exploding. Since I am in the security business, understanding how RFID is used for secure access to large data centers and other secure facilities is important. In my research, I came across an interesting project involving an Arduino Nano. The Tastic RFID stealer is a very clever hack.

Continue reading