Way back in 2013 a very creative and talented Maker named Andrew O’Malley created the DOTKLOK project. The project has been dormant for a very long time.
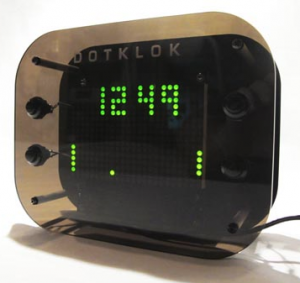
Ol’ Sopwith is a long time clock builder and I became fascinated with this project. Why? Several reasons: a really cool set of clock animations including ‘pong’, ‘space-invaders’, and ‘pac-man’, a custom Arduino design that is easy to build from through-hole parts, and excellent documentation.
In 2014, I purchased enough parts to build three DOTKLOKS. The only thing I did not have was the acrylic front and back panels. At that time, Andrew was selling the clock in kit form or assembled. The problem for me, was the cost was beyond what I was willing to pay.
Without the panels, I packed up the parts and stored them in the parts closet with the intention of building an enclosure out of wood when I found the time. Never happened.
Recently, I discovered there are plenty of on-line ‘self-serve’ laser cutting services that can cut the acrylic panels for a DOTKLOK. Although a set costs about $20 USD (ouch), I took the plunge and ordered a set of panels using the provided Inkscape SVG from the project.
Once the panels arrived, I created a ‘prototype’ DOTKLOK. When I loaded up the Arduino code version 1.5 into the Arduino development GUI, I quickly discovered the code failed compilation with dozens of errors. It seems the Arduino API has changed considerably over the last five years. No surprise.
After a fair amount of research and effort, I was able to upgrade the code and get a clean compile. I uploaded it to the DOTKLOK prototype and it fired right up. Oh the joy. There are still some problems with the code in some of the animations, but I will fix those soon.
As I always do, I decided to hack the original DOTKLOK design to make it better. The aluminum standoffs are ugly and Andrew used two of them stacked together to get the right length. I also want to use shorter standoffs to make the clock “thinner.”
I ordered black aluminum standoffs (metric) and matching screws from AliExpress (China). They should arrive in a couple of weeks. I also discovered the Sure LED arrays used in the project are still available from a few sources, but only available in red.
I will publish all of my work on the DOTKLOK revival project soon. If you are interested in purchasing a kit or assembled DOTKLOK, let me know. I will consider making them available.
Thanks again to Andrew O’Malley for creating such a cool project.
Sopwith