DOTKLOK Revival – Update

Way back in June 2019, I posted an article about the revival of the DOTKLOK project.

I worked hard and made some changes to the design. Unfortunately, I could not find the same LED displays that were used in the original project. The Chinese company SURE no longer makes these displays. I literally hounded them to find me some new-old-stock (NOS) and came up empty.

This means I have to find a different source of LED displays. I did find some alternatives, but they are a different size and use a completely different API specification. To get this to work, I have to redesign the case and rewrite the source code that drives the clock.

I have not given up on the idea, but there is a lot of work here. Stay tuned.

Prusa Printer Update – 1 Year Later

It is hard to believe it has been a year since I bought my Prusa i3 MK3S printer. I have used it a lot. I am completely satisfied with its performance. I would estimate I have burned through about 8 rolls of filament. Along the way, I learned a few tricks – many of them the hard way. Here is the list:

  1. Completely clean the print bed between prints. This is super important. Everyone seems to have their favorite method, I prefer to use acetone to wipe down the bed. It should be as clean as a surgery room floor.
  2. Make sure the extruder nozzle area is spotless. When you have a print fail, it is often because the print object did not stick to the bed. Depending on when you discover this, you could have quite a mess on your hands. Before you start a print, make sure the entire areas around the print nozzle is clear of debris. If there are any remnants of melted filament from the previous print, it will surely mess up your current print.
  3. Invest in better filament. I have used both PLA and PETG filament in my printer with excellent results. As I said in a previous post, I am not a big fan of the Prusa filament. I also had pretty miserable experiences with the Inland brand of filament sold at MicroCenter and on Amazon. It is cheap – so I guess you get what you pay for. I have had excellent success with the 3D-Solutech and HatchBox filaments, and highly recommend them. HatchBox seems to be a favorite among Prusa users. I also bought a roll of pink PLA from TecBears and it worked great.
  4. Store filament in airtight plastic bags with a desiccant bag. Living in southern California does not put a lot of stress on 3D filament. If you live in an area with high humidity, beware – filament breaks down quickly when it is around moisture.
  5. Clean everything up after a failed print. You will have prints blow up on you. In many cases this will make quite a mess. Most of my failures occur because the print object is not oriented correctly. One time, I failed to clean up the mess completely, and some hair from the failed print got stuck in the print fan. This caused the thermal sensor in the print head to shut down the printer.
  6. Keep your printer firmware up to date. I use the Prusa slicer to prepare my prints. The slicer puts a notification file on the SD card that tells the printer there is a new firmware version available for the printer. It only takes a few minutes to upgrade the printer firmware using a laptop coputer.

Prusa i3 MK3S 3D Printer Kit (Part-4)

This is the final entry in the 4-Part blog posts re. my Prusa i3 MK3S printer. The previous posts can be found here: Part-1, Part-2, Part-3.

Once I completed assembly of my printer, I followed the instructions to do a self-test and calibration. The self-test failed while performing the “Loose belt pulley test” on the X-axis. The manual said to be sure the motor pulleys are not loose, and to be sure the screws are tightened against the flat part of the pulley shaft.

First, I checked all the pulleys and they were not loose. This was puzzling to me, because I could not get rid of the error. I finally decided to re-tighten the X-Y belts. This fixed the problem. I was quite surprised how tight the belts had to be in order to pass the self-test. If you run in to this same situation, check your belt tension.

The next challenge I had was getting the print head depth calibrated correctly. I followed the instructions using the ‘sheet of paper’ method, but the hard part for me was getting the “first layer” calibration correct. This involves getting the perfect Z-axis height at the beginning of the print. The instructions really did not provide a lot of help – they simply describe, in general, what the thickness of the print layer should be.

Continue reading

Prusa i3 MK3S 3D Printer Kit (Part-3)

In Part-1 of the Prusa i3 MKS3S 3D printer kit build, I gave a brief overview of my build experience. In Part-2, I provided more details of putting the printer together. Here in Part-3, I finish up describing the challenges I had during the assembly process.

NOTE: Remember, the below steps are just highlights of my assembly experience. They do not match the assembly steps in the manual.

Step-7 – Installing the X and Y belts. As the build continued, the number of parts to physically work around as you assemble components increases. I found the section on belt installation challenging. The toothed belts are provided flat – not a continuous loop. You have to bend a belt end tightly around a bolt on the belt tensioners, and run them around pulleys.

Impression-7 This part of the assembly took way longer than it should. It was very difficult to determine how to set the correct tension. This caused me great pain later in the assembly. I would say the belts mechanisms are one of the most important parts of a 3D printer.

Step-8Assembling the PSU. You may recall in Step-5, I assembled the PSU mounting bolts on the wrong side of the rail. Now that the printer was 75% assembled, it came to haunt me. When I went to mount the PSU, the screws were on the wrong side.

Impression-8 The manual was very predictive. “Incorrect placement of the PSU holders will lead to issues later,” is the ground truth. I had to disassemble a lot of parts to correct this issue.

Continue reading

Prusa i3 MK3S 3D Printer Kit (Part-2)

In Part-1 of the Prusa i3 MKS3S 3D printer kit build, I gave a brief overview of my build experience. In Part-2, I provide more details of putting the printer together.

First – some free advise. Take your time building this kit. It is a big assembly project. Trust me on this. In my case it took a full weekend to get it to work.

NOTE: Remember, the below steps are just highlights of my assembly experience. They do not match the assembly steps in the manual.

Step-1Pull the “Assembly Instructions” manual out of the big parts box, and then put the box away. Spend an hour or more going through the assembly manual. READ IT. Mark it up with notes. Get familiar with every step of assembly. All of it. Consume this manual if you want to be successful in your build.

Impression-1 The documentation is excellent. As good as it is, I was tripped up in a couple of places that really sent me down some rabbit-holes. Details follow.

Step-2Inventory the parts in the boxes. There are a lot of parts in this kit. Again, the packaging of the parts is terrific. All in their own box, all well marked. This will save you a lot of time.

Impression-2 The kit comes with a box of “extra” parts. Whoah! Does it ever. The box of extra parts is enormous. At one point I was beginning to believe I could build a second printer with the number of extra parts. I understand why they do this. Sending a missing or broken part to the US takes time and money.

Continue reading

Prusa i3 MK3S 3D Printer Kit (Part-1)

I finally got around to assembling my Prusa i3 MK3S 3D printer kit. And it was quite an adventure. In the next couple of blog entries, I will walk through the experience.

The short version?

  1. I made the right choice buying this printer.
  2. The design, quality, and documentation are first-rate.
  3. The kit is not for beginners.
  4. It takes a long time to put it together.
  5. It did not work out of the box.
  6. 3D printing is a whole new world if you are a maker.
  7. 3D printing requires endless patience because it take time to make things.

Continue reading

DOTKLOK Revival

Way back in 2013 a very creative and talented Maker named Andrew O’Malley created the DOTKLOK project. The project has been dormant for a very long time.
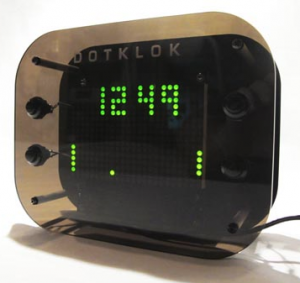
Ol’ Sopwith is a long time clock builder and I became fascinated with this project. Why? Several reasons: a really cool set of clock animations including ‘pong’, ‘space-invaders’, and ‘pac-man’, a custom Arduino design that is easy to build from through-hole parts, and excellent documentation.

In 2014, I purchased enough parts to build three DOTKLOKS. The only thing I did not have was the acrylic front and back panels. At that time, Andrew was selling the clock in kit form or assembled. The problem for me, was the cost was beyond what I was willing to pay.

Without the panels, I packed up the parts and stored them in the parts closet with the intention of building an enclosure out of wood when I found the time. Never happened.

Recently, I discovered there are plenty of on-line ‘self-serve’ laser cutting services that can cut the acrylic panels for a DOTKLOK. Although a set costs about $20 USD (ouch), I took the plunge and ordered a set of panels using the provided Inkscape SVG from the project.

Once the panels arrived, I created a ‘prototype’ DOTKLOK. When I loaded up the Arduino code version 1.5 into the Arduino development GUI, I quickly discovered the code failed compilation with dozens of errors. It seems the Arduino API has changed considerably over the last five years. No surprise.

After a fair amount of research and effort, I was able to upgrade the code and get a clean compile. I uploaded it to the DOTKLOK prototype and it fired right up. Oh the joy. There are still some problems with the code in some of the animations, but I will fix those soon.

As I always do, I decided to hack the original DOTKLOK design to make it better. The aluminum standoffs are ugly and Andrew used two of them stacked together to get the right length. I also want to use shorter standoffs to make the clock “thinner.”

I ordered black aluminum standoffs (metric) and matching screws from AliExpress (China). They should arrive in a couple of weeks. I also discovered the Sure LED arrays used in the project are still available from a few sources, but only available in red.

I will publish all of my work on the DOTKLOK revival project soon. If you are interested in purchasing a kit or assembled DOTKLOK, let me know. I will consider making them available.

Thanks again to Andrew O’Malley for creating such a cool project.

Sopwith


Your Robot Can Do What?

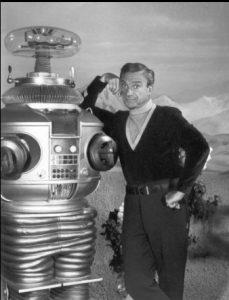
I have always been interested in robots since I was a kid. “Lost In Space” was one of my favorite TV shows in the 60’s, and the show had a very cool robot.

(Photo attribution)

I must admit I do not spend a lot of time hacking robots, although the Maker space is ripe with opportunities. The Raspberry Pi and Arduino universe is over-run with cool robotic gadgets.

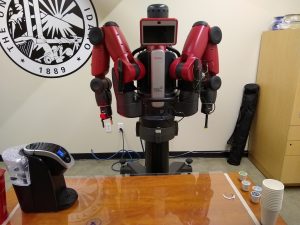
When I was touring the University of Idaho robotics lab with Dr. John Shovic last month, he introduced me to one of the labs’ robots named “Baxter.” (John likes to keep things simple.)

Baxter

When I asked John what Baxter could do, he said, “He makes a great cup of coffee.”  No wait – what? Now I know there are lots of robots that do some cool stuff. There is one that cleans your floors. There are a bunch of Maker robots that can follow a line, back away from walls, and move through obstacle courses. But make coffee? Now this is cool! Exactly the kind of thing a robot should do!

Here is video of Baxter performing his mastery.

Ol’ Sopwith has great faith in the young generation of robotics students if they continue to teach robots how to do things like this!

Sopwith


About to Enter the 3D Printer World

I know you smoke breathers may find this hard to believe, but Ol’ Sopwith is finally going to enter the universe of 3D printing. I have dragged my feet on this technology for a couple of reasons.

  • I did not want to spend the money. $300 USD 3D printers are cheap and temperamental, and $2500 USD printers are way above what I am willing to pay.
  • I was afraid it would not be useful. (I do not want to waste time printing toy objects.)
  • I did not have the time to invest in learning a whole new technology from the ground up.
  • I did not have space for it.
  • I did now want a noisy, smelly device in my office or workshop.

Time have changed. I have a couple of projects I am working on that could really use the capabilities of a 3D printer. Plus the cost of really good printers has come down and the capabilities have gone up dramatically.

After extensive research, I decided the best printer on the market for price/performance is the Prusa i3 MKS3. The are built in Czechoslovakia by a company founded by Josef Prusa, one of the innovators in the 3D early days.

I ordered the kit version and am expecting it will take about 4 hours to assemble. It should arrive in a couple of days. I will post blog entries about my assembling, testing, and printing experiences so you can follow along.

Stay tuned.

Sopwith

A Visit with Dr. SwitchDoc Labs – John Shovic

I had the great fortune to spend a long Memorial Day weekend in Coeur d’Alene, ID. Anytime I am on the move, I like to check out whom of my acquaintances live in the area so I can buy them a cup of coffee.

On this trip, I struck pay dirt! Dr. John Shovic, the founder of SwitchDoc Labs lives there. I first “met” John virtually, way back in the early Pi days when he wrote for the brand new PiMag.

He wrote a series of articles about his adventures building a Pi based weather station and mounting it on a Ham radio tower in the remote Caribbean island of Curacao. I was fascinated with his story and followed it closely. Only John would be crazy enough to come with this idea – and then act on it.

For those who are interested in reading his articles, I have included the download links to the magazines below:

John was kind enough to meet me at the beautiful Coeur d’Alene Innovation Den and show me around. John has his robotics lab here and he spends most of his time with his students from the University of Idaho where he teaches. Many of you know John by following his endless projects and innovations at SwitchDoc Labs and his many KickStarter projects.

What a privilege it was for me to be able to spend time with this brilliant, fun, and laid-back man. As I was flying back home thinking about my great holiday, I kept trying to figure out how I was going to keep up with John and all of his cool Maker projects.

I will have more to say about John in future blog posts.

Sopwith