Airplane Fun Revisited


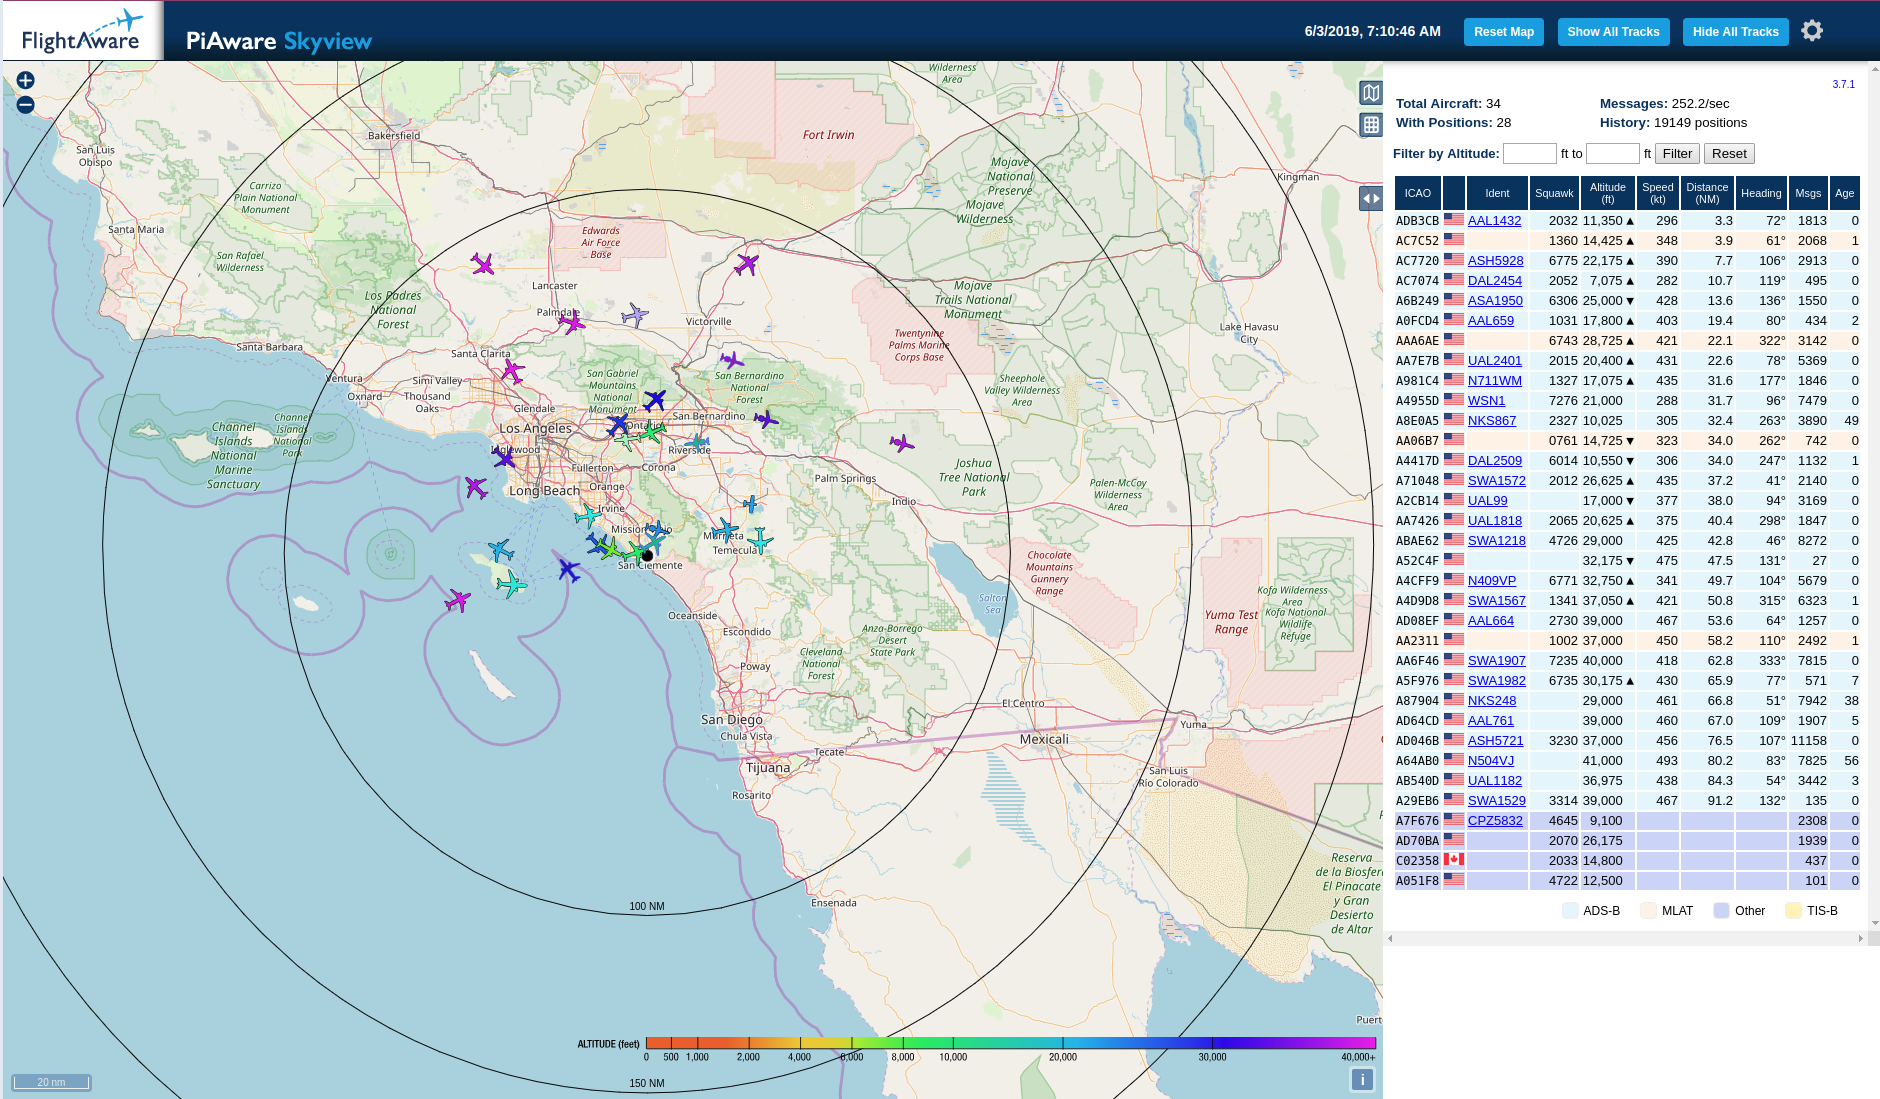
A very long time ago I wrote a blog about tracking airplanes. I was living in London at the time very near London City airport. That project was a lot of fun, so I hacked together another Pi setup to track airplanes here in the Los Angeles area.

I decided to install PiAware and provide my tracker feed to FlightAware. Why? Because if you do, you are given an Enterprise level account (value – $89 USD/month). I fly a lot and use the FlightAware app on my Android phone all the time. It is so easy to track my inbound airplane when I am waiting for a flight.

FlightAware has detailed instructions on how to build a PiAware setup.

The below image from FlightAware’s web site  shows how many other Makers have blazed this trail before me. That is a lot of Raspberry Pi’s folks.

For my setup I used the below components:

  1. Raspberry Pi3 B+
  2. Pi case with cooling fan
  3. RTL-SDR UBS dongle (This is what receives the radio signals from the antenna)
  4. An extended range WiFi adapter (USB)
  5. A FlightAware optimized antenna

Putting it all together was a snap. To install the software, follow the detailed instructions on the FlightAware web site.

Continue reading

Zabbix Agent User-Parameters

This is part three of the ‘How-To‘ series on leveraging the Zabbix IT monitoring platform using a Raspberry Pi. Part-1 showed how to install the Zabbix server on a Pi. Part-2 showed how to get the Zabbix agent running on a Pi. In this post, I show how to graph the CPU and GPU temperature of a Pi and the temperature/humidity readings from a precision AM2315 temperature sensor.

The Zabbix platform is incredibly flexible. It allows nearly endless possibilities of tracking and graphing data using custom User-Parameters. This is very useful to Makers since it allows the monitoring of sensor data on custom dashboards.

You can download the ‘How-To’ document here. I have also provided a zip file containing the custom scripts and agent configuration user parameter section on the downloads page.

Let me know how you use the Zabbix platform with your Pi fleet to monitor and track sensor data.

Zabbix Agent on a Raspberry Pi

In my last post I showed how to install the Zabbix IT monitoring platform on a Raspberry Pi. This highly capable and flexible open-source platform provides the ability to track the status and performance of your Pi fleet.

In this post, I provide the second part of a Zabbix implementation on a Pi: How-to install and configure the Zabbix agent and create dashboards on the server.

You can download the detailed ‘How-To’ document in PDF format here.

Zabbix Server on a Raspberry Pi

I received an interesting Email last week from someone who wanted to know if I knew how to monitor an AM2315 temperature sensor attached to a Raspberry Pi using a Zabbix server.

My response? Ummm… What is Zabbix? After some brief research, I was introduced to another stellar open-source project with terrific documentation.

Zabbix is a platform used by IT professionals all over the world to monitor their infrastructure. The platform consists of a server component and a deployable agent that runs on nearly anything. The agent is used to report back to the server performance metrics such as memory, disk, CPU utilization, and a boatload of other metrics. All in a beautiful and configurable dashboard.

The Zabbix system is very flexible and allows the creation of custom agent commands that allow you to configure and monitor any platform.

I was so intrigued by this newly discovered gem, I downloaded and installed it on a Raspberry Pi3. I have written a ‘How-To’ document that walks through the process.

In upcoming posts I will show how cool this platform really is. In fact, I will even show how to report temperature sensor and other data to a Zabbix server.

Pi Real-Time Clock ‘How-To’

For Makers that need an accurate clock for their projects, the Raspberry Pi does not have one. In order to save costs and board space, a hardware clock is missing in all versions of the Pi. Fear not. There are many options available if you need an on-board clock for a project.

DS3221 RTC

I have written a ‘How-To‘ document that walks through the details of getting a real-time clock (RTC) up and running on a Raspberry PI. I know there are plenty of resources on the Web that show how to do this, but I like to take the extra time to write a complete document, not just a list of bullet points.

Makers that are new to the Raspberry Pi and its SBC brethren appreciate having the screen-shots that make it easier to follow along. As long as my ‘How-To’s’ help beginner or intermediate Makers create cool things, I will continue to write documentation.

You can download the ‘How-To here.

AM2315 Update

Hello to all my smoke-eating Maker friends. O’l Sopwith has a story to tell. In my February 1st post, I posted the pure Python source code and updated the implementation documentation for the ever-so-popular AM2315 temperature sensor.

I did this after receiving an Email from a fellow Maker who wanted to know why my sample AM2315 code did not work with Python3. The day after I published that blog entry, a comment was posted stating they could not get their sensor working. The AM2315 was visible in the i2cdetect test, but it would not return any data. The Python code crashed and burned.

About a week of communicating back-and-forth to troubleshoot the problem, this is what we did:

  • Turned on Debug mode in the python script
  • Made sure the device was wired correctly
  • Made sure the correct software was installed
  • Disconnected all other devices from the Pi
  • Ran the SwitchDoc Labs test script (same stack trace)
  • Ensured the Pi had a 2.0 amp power supply

About the same time this was going on, the mate who asked about the Python3 port downloaded and tested the new code. He could not get it to work either. Thinking he had a bad sensor, he set up a test harness and tested his sensor on an Arduino. It worked fine. After some fiddling around, he determined the MAXREADATTEMPT = 3 on line 23 was too small a value. He changed it to 10, and his sensor worked fine.

Continue reading

AM2315 Implementation Doc Update

After more than 5 years, I still get an occasional Email from Makers who ask questions about the Aosong AM2315 temperature/humidity sensor. I got one this week asking why my AM2315 python code did not work with Python3.

This nudged me to take a look at my code and figure out what it would take to get it to work with Python3. Next thing you know, I decided to remove the underlying dependency on any C code libraries and ensure my sample Python code works in both Python2.7 and Python3 without modifications.

To do this, I rely on two Python modules. The first is the great code written by our friends over at Adafruit. They have created a Rapsberry Pi GPIO code module written in pure Python. The second module is from the innovative folks over at SwitchDoc Labs.

I have updated the AM2315 Implementation Guide with the new changes. I also modified the SwitchDoc code so that it will work with Python3.

Now it is time for a rant. If you are a Python programmer, it is time for you to get serious about Python3 if you are still clinging to your Python2.7 worldview. All new code you write should be written in Python3. Python2.7 has an End Of Life date on January 1, 2020. There is a lot of 2.7 code out there that will work in Python3 with just a few changes. In fact, the only changes I made to get the SwitchDoc code to work was putting parenthesis around the print statements. EOR. (End of Rant)

You can download the updated implementation document with a code sample here. Thanks to Adafruit and SwitchDoc Labs for being a part of the Open Source community.

Home Automation Hacking Part-III

This is Part-III of an ongoing series of Ol’e Sopwith’s adventures with a home automation project. Part-1 started off with the ambitious idea of doing a bake-off between openHAB and Home Assistant. In Part-II, I learned the openHAB platform and achieved all of my goals of getting numerous Z-Wave devices on-line. I even took the time to create a detailed openHAB “How-To” to assist those of you that are new to the platform. Very happy with the results.

Here in Part-III, my plan was to do the same with Home Assistant. Dig into the bits and document how it works. My hope was to get all of my Z-Wave devices behaving the same way in Home Assistant (HA) as they were in openHAB.

Not so fast Shirley. From the moment I started to learn HA, I ran into problems. For example, I started on this page, “Install Home Assistant”, and followed the instructions exactly. I burned the image and booted the Pi. Notice the below instructions 6-8.

Continue reading

Home Automation Hacking Part-II

In Part-1 of this hacking series, I set the stage for an adventure in home automation hacking. My goal is to start small, grow a system over time, and share the experience.

To follow along on my openHAB adventure, instead of creating an enormous blog entry, I decided to document it in a PDF ‘How-To’ document. I have found these types of documents are highly valuable to those folks that are new to the Raspberry Pi and Linux, and/or those who have little programming experience. Download the PDF and configuration files below:


Here in Part-II, we explore my adventures with openHAB.

To learn more about openHAB, read Part-I of this series or head over to their web site. I started knowing nothing about openHAB, so I spent a lot if time in the documentation. Next, I burned an image of openHABian and fired it up on a Raspberry Pi 3.

In a couple of weeks of study and hacking, I have a working home automation system that is quite cool. Below is a view of my openHAB system as seen in a browser.

Continue reading

Home Automation Hacking Part-I

Hello smoke-breathing brethren. Ole’ Sopwith is about to embark on another hacking adventure. This time it is all about home automation. Yes, it seems I am a little late to the party – but hey – at least I showed up!

There are two goals to this project. 1) To learn something new, and 2) To have fun. Wait a minute! Those are the goals of every Sopwith project!  Yes – but this project should be really interesting. In this multi-part blog series, I am going to compare the two leading open-source home automation platforms:  OpenHab and Home Assistant.

OpenHab is a Germany based open source project founded in 2010. It is written in Java and is based on the Eclipse SmartHome platform. It has a very active community with a very large pool of developers. It provides the ability to integrate hundreds of home automation devices, regardless of manufacturer or whether is it open or closed hardware. The cool thing about OpenHab is that it provides a mechanism to build a complete home automation environment and keep it private.

Home Assistant is another very active open-source home automation platform written in Python3. It also has a vibrant and active community. Founded in 2013 by Paulus Schoutsen, it began as a simple Python script to turn on some lights when the sun set.

Continue reading